Advanced Memory Management: Breaking the Memory Wall
You’ve optimized your kernels and quantized your weights. Your MobileNetV2 fits comfortably in 14MB. But then, the requirements change. You are asked to run a Large Language Model (LLM) with 7 billion parameters ( ) on a laptop with an 8GB GPU.
This is the Memory Wall. Modern AI models are growing faster than GPU VRAM. If you simply try to allocate everything, your application will crash with VK_ERROR_OUT_OF_DEVICE_MEMORY.
In this chapter, we are going to learn how to manage GPU memory like a professional. We will explore both the Pragmatic Path (optimizing ONNX Runtime’s memory footprint) and the Educational Path (building custom resource-aliasing sub-allocators).
The Pragmatic Path: Optimizing Library Memory
If you are using ONNX Runtime, you don’t have to worry about vkBindBufferMemory immediately, but you still need to manage the Memory Arena.
1. Memory Arena Configuration
ONNX Runtime uses a "Buddy Allocator" internally called an Arena. By default, it allocates memory in large chunks to minimize syscalls. For embedded devices, this can be too aggressive.
Ort::SessionOptions options;

// Configure the CPU Arena
// '1' enables the arena, '0' disables it (for absolute minimal footprint)
options.AddConfigEntry("session.use_ort_model_bytes_for_initializers", "1");

// Configure the GPU Arena (WebGPU/DirectML)
// You can limit the total memory ONNX is allowed to touch
options.AddConfigEntry("session.gpu_mem_limit", "2147483648"); // 2GB
2. Memory Mapping (External Initializers)
For models like Llama-3 or Stable Diffusion, you cannot load the entire model into a std::vector<uint8_t> in RAM first. You will run out of CPU memory before you even touch the GPU.
-
The Pro Move: Use Memory Mapping (
mmaporCreateFileMapping). This allows the OS to treat the model file on disk as a virtual array. -
ONNX Integration: You can tell ONNX Runtime to use these mapped pointers as "External Initializers," bypassing the standard "Load → Copy" cycle.
The Math of the Wall: Throughput vs. Latency
When a model is too big for VRAM, we must store the weights in system RAM and "stream" them to the GPU on demand. The bottleneck is the PCIe Bus.
For a 14GB model on a PCIe 4.0 x16 slot ( ):
This means even if the GPU math takes zero time, your model will never run faster than . To solve this, we must use Asynchronous Transfers to hide the "Loading" time of Layer behind the "Computing" time of Layer .
Strategy 1: Resource Aliasing (The Buffer Pool)
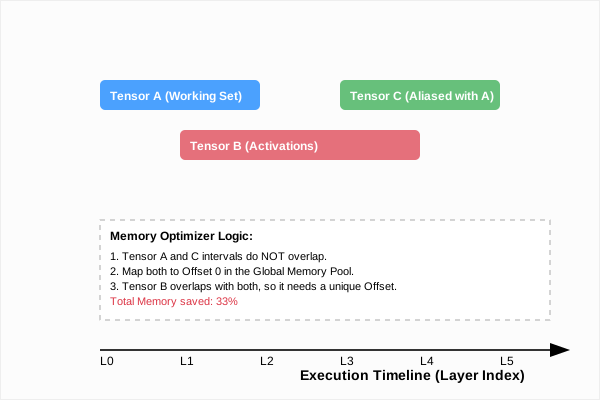
The most wasteful pattern in ML is allocating a unique buffer for every layer’s output. Layer 1 outputs to Buffer A, Layer 2 reads A and writes to Buffer B. By Layer 50, you have 50 buffers, even though 48 of them are sitting idle at any given moment.
Resource Aliasing allows multiple "Virtual" buffers to share the same physical memory.
The Liveness Analysis Algorithm
To alias memory, you must first calculate the Liveness of every tensor in your graph.
-
Trace: Walk the execution graph. For each tensor, mark the index of the first layer that writes to it and the last layer that reads from it.
-
Overlap: Two tensors can share the same memory if their
[First, Last]intervals do not overlap. -
Heap Packing: We treat the GPU memory as a 1D heap and use a First-Fit Decreasing algorithm to pack these intervals as tightly as possible.
Implementation: The Life-Cycle (C++)
First, we define a structure to represent a tensor’s residency in time (layer index) and space (bytes).
struct TensorInterval {
    std::string name;
    uint32_t firstLayer; // Index of the layer that creates it
    uint32_t lastLayer;  // Index of the layer that last reads it
    VkDeviceSize size;
    VkDeviceSize offset = 0; // To be calculated
};
Applying Aliases in Vulkan
Once offsets are calculated, you create multiple VkBuffer objects but bind them to the same VkDeviceMemory block.
// 1. Calculate total required memory pool size
VkDeviceSize totalPoolSize = calculateRequiredHeap(tensors);

// 2. Allocate one big block of DEVICE_LOCAL memory
vk::MemoryAllocateInfo allocInfo{ .allocationSize = totalPoolSize, ... };
auto sharedMemory = device.allocateMemory(allocInfo);

// 3. Bind virtual buffers to the pool with calculated offsets
for (const auto& t : tensors) {
    // This is the core trick: multiple buffers, one memory object
    device.bindBufferMemory(t.vkBuffer, sharedMemory, t.offset);
}
Important Safety Note: When using aliasing, you must use pipeline barriers between layers that share the same memory. If Layer 5 is writing to an offset that Layer 2 just finished using, a barrier ensures Layer 2’s reads are truly complete before Layer 5 starts corrupting that memory.
Strategy 2: Weight Streaming with Ping-Pong Buffers
If the weights themselves are too large (LLMs), we must "stream" them layer-by-layer. To do this without stalling the GPU, we use Ping-Pong Buffering.
-
Buffer A: Contains weights for the layer the GPU is currently calculating.
-
Buffer B: Is being filled by the DMA engine with weights for the next layer.
The Asynchronous Handshake
We use Timeline Semaphores to coordinate the CPU, the DMA engine (Transfer Queue), and the Compute engine (Compute Queue).
// CPU Orchestration Loop
for (int i = 0; i < numLayers; ++i) {
    // 1. Wait for the pre-fetch of Layer i to finish
    vk::SemaphoreWaitInfo wait{ .semaphore = weightReady[i], .value = 1 };
    device.waitSemaphores(wait, UINT64_MAX);

    // 2. Dispatch Compute for Layer i
    cmd.dispatch(...);

    // 3. Start the pre-fetch for Layer i+1 immediately (Non-blocking)
    if (i + 1 < numLayers) {
        submitAsyncTransfer(weights[i+1], bufferPingPong[(i+1)%2]);
    }
}
Zero-Copy Synchronization: The "Fence vs. Semaphore" Choice
When streaming weights, you have two choices for synchronization: 1. Fences (Coarse): The CPU waits for the GPU to finish. This is easy to code but can leave the GPU idle for several microseconds while the OS context-switches. 2. Timeline Semaphores (Fine): The GPU waits for the DMA engine to finish. The CPU is never in the loop. This is the Gold Standard for high-performance streaming.
// GPU-to-GPU Synchronization (No CPU intervention)
vk::TimelineSemaphoreSubmitInfo timelineInfo;
timelineInfo.setWaitSemaphoreValues(transferCompleteValue);
timelineInfo.setSignalSemaphoreValues(computeCompleteValue);

submitInfo.setPNext(&timelineInfo);
computeQueue.submit(submitInfo);
Strategy 3: Zero-Copy on Unified Memory (SoCs)
If you are targeting Apple Silicon (M1/M2/M3), Intel Xe, or ARM Mali (Android), you have a massive advantage: Physical Unified Memory. The CPU and GPU share the same silicon and the same physical RAM.
-
The Mistake: Using
vkCmdCopyBufferto move data from a "Staging" buffer to a "Device Local" buffer. On these chips, this is a redundant copy that wastes 50% of your memory bandwidth and drains the battery. -
The Pro Way: Use
VK_EXT_external_memory_host. This allows you to map a standard CPU pointer (frommallocorstd::vector) directly into a Vulkan buffer.
// Map an existing CPU buffer directly to Vulkan
vk::ImportMemoryHostPointerInfoEXT importInfo{
    .handleType = vk::ExternalMemoryHandleTypeFlagBits::eHostPointerEXT,
    .pHostPointer = my_large_weight_array.data()
};

vk::MemoryAllocateInfo allocInfo{
    .pNext = &importInfo,
    .allocationSize = my_large_weight_array.size(),
    .memoryTypeIndex = findHostPointerMemoryType()
};

device.allocateMemory(&allocInfo, nullptr, &sharedMemory);
The GPU now reads your weights directly from system RAM at full speed. There is no transfer command, no latency, and zero memory duplication.
Production Safeguards: Budget and Priority
In a real OS, other apps are fighting for VRAM. A professional engine must be a "Good Citizen."
-
VK_EXT_memory_budget: Always query
VkPhysicalDeviceMemoryBudgetPropertiesEXTbefore starting inference. If you are near the limit, automatically trigger a "Weight Eviction" policy (moving older weights back to system RAM). -
VK_EXT_memory_priority: Set the priority of your weights to
1.0(high) and your temporary activation buffers to0.5(medium). If the OS needs to swap memory to disk, it will keep your weights in VRAM and swap the temps first.
Summary: The Memory Management Checklist
-
Detect Topology: If Integrated (Unified), use Zero-Copy pointers via
VK_EXT_external_memory_host. -
Pool Activations: Use a liveness-aware sub-allocator to alias non-overlapping tensors.
-
Stream Weights: For LLMs, implement a Ping-Pong async transfer pipeline using Timeline Semaphores.
-
Pinned Memory: On desktop, ensure all host-side buffers are Host-Coherent and Host-Visible to enable DMA at .
Memory management is about Logistics. You aren’t just a programmer; you are a traffic controller moving gigabytes through a narrow pipe.
In our final chapter of this section, we will look at Model Optimization—how to rewrite the network itself to be more efficient.