Reinforcement Learning for Automated Exploration
Up to this point, we’ve been teaching our CI to verify things we already know about. We tell it: "Check this button," or "Verify this texture." But what about the bugs you haven’t thought of? What about that rare crash that only happens if you click the 'Options' menu exactly three times while a level is loading?
In this final chapter of the Desktop Applications section, we’re going to build something truly autonomous. We’re going to create a Reinforcement Learning (RL) agent—a tireless, digital QA tester whose only job is to explore your application and find things that look "new" or "broken."
Beyond Scripted Tests
Traditional testing is like a checklist. You follow the steps, you check the boxes. But applications are complex, and the state space is infinite. You can’t write a test for every possible sequence of inputs.
An RL agent doesn’t follow a script. It learns by interacting. It clicks buttons, moves the camera, and navigates menus. But unlike a human, it can do this thousands of times an hour, 24/7, inside your CI pipeline.
The Markov Decision Process (MDP)
To build our explorer, we must frame our Vulkan application as an MDP. * State ( ): The current screen pixels (what the agent "sees"). * Action ( ): A click or a keystroke (what the agent "does"). * Transition: The application moving to the next frame/menu based on the action. * Reward ( ): A numerical value telling the agent how "good" its action was.
In most RL problems (like Atari games), the reward comes from the game score. But in a Vulkan app, there is no score. We must invent one.
Curiosity-Driven Exploration
We’re going to focus on Curiosity-Driven Exploration. Instead of rewarding the agent for "winning," we’re going to reward it for being surprised.
The Challenge: How do you reward a QA tester?
In a typical RL scenario—like teaching an agent to play Chess—the reward is simple: you win (+1) or you lose (-1). But in a Vulkan application, there is no "winning." We just want the agent to explore as much as possible.
If we reward it for finding crashes, it might find one crash and then just keep doing that same thing over and over again to maximize its "score." That’s not helpful.
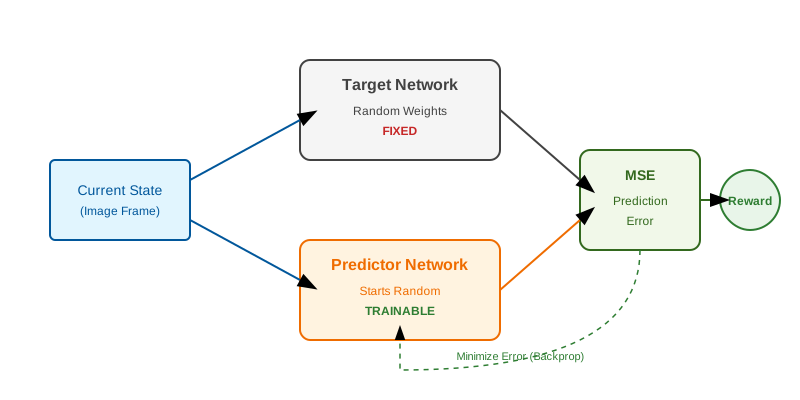
Instead, we use a technique called Random Network Distillation (RND). We reward the agent for seeing things it hasn’t seen before.
The "Surprise" Mechanic: RND
Imagine you have two friends, Alice and Bob. * Alice has seen every possible screen in your app once, and she has a perfect memory. You can show her any screen, and she’ll immediately tell you exactly what it looks like. * Bob is currently learning from Alice.
When you show them a screen they’ve both seen a thousand times (like the Main Menu), Bob can predict exactly what Alice will say. There’s no surprise.
But if you show them a screen that is rare—like a crash report or a hidden debug menu—Bob will struggle to predict Alice’s response. That "prediction error" is our reward!
Why "Distillation"?
In RND, we don’t actually have a human Alice. Instead, we use a Random Fixed Network. This network is initialized with random weights and never trained. It represents a complex mathematical "landscape."
Our agent’s "Curiosity Network" tries to Distill (predict) the output of that random network. * For familiar pixels, it succeeds (low error). * For new pixels, it fails (high error).
Where is the fixed random target and is our trainable predictor.
Architecture: Connecting the Agent to Vulkan
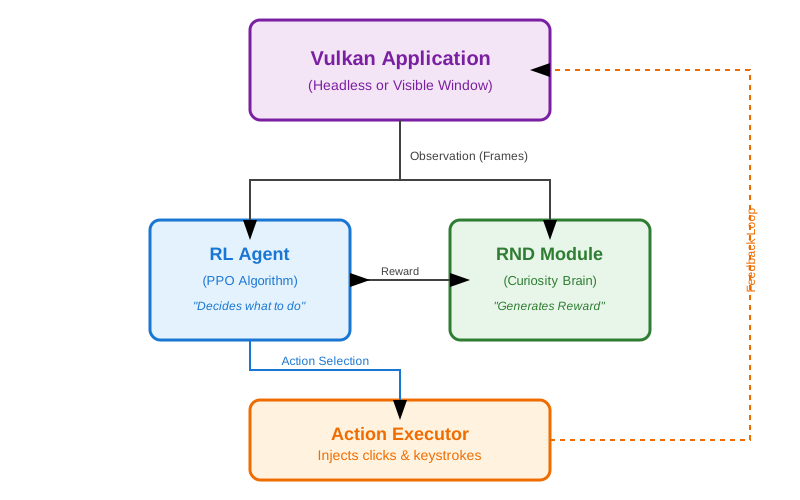
To make this work, we need three pieces: 1. The Environment: Our Vulkan application. It needs to send frames to the agent and accept input (clicks/keystrokes) back. 2. The Brain: The RL agent (we’ll use an algorithm called PPO) that decides what to do next. 3. The Curiosity: The RND module that calculates how "surprising" each frame is.
Implementing the RND Module
Start with the curiosity reward system:
class RNDCuriosityModule:
    """Computes a reward based on how 'surprised' we are by a frame."""
    def __init__(self, device='cuda'):
        # Alice: Fixed random network (the 'Target')
        self.random_net = RandomNetwork().to(device)
        # Bob: Trainable network (the 'Predictor')
        self.predictor_net = PredictorNetwork().to(device)

    def compute_intrinsic_reward(self, frames):
        with torch.no_grad():
            target_features = self.random_net(frames)

        predicted_features = self.predictor_net(frames)

        # The more Bob struggles to predict Alice's output,
        # the higher the 'curiosity' reward.
        reward = torch.mean((predicted_features - target_features) ** 2, dim=1)
        return reward
The predictor gradually learns to match the random network on familiar states, making those states less rewarding. Novel states remain highly rewarding until the agent sees them enough times.
Vulkan Application Interface
The agent needs to interact with your Vulkan app. Two approaches:
Approach 1: Programmatic Control
Instrument your application to accept commands from the RL agent:
class RLControllableApp {
public:
    void run() {
        while (!shouldClose_) {
            // 1. Check for actions from the RL agent
            if (popAction(action)) executeAction(action);

            // 2. Standard Vulkan Render
            render();

            // 3. Capture observation (frame) for the agent
            auto pixels = readFramebuffer();
            sendToAgent(pixels);
        }
    }

private:
    void executeAction(const Action& action) {
        // Map agent actions to UI events (e.g. ImGui mouse/key injection)
        if (action.type == Action::Click) injectClick(action.x, action.y);
        // ...
    }
};
Approach 2: External Control (Linux)
Use X11 or Wayland to inject input events externally:
class ExternalVulkanController:
    """Uses OS-level tools (like xdotool) to control a standard Vulkan app."""
    def __init__(self, app_command):
        self.process = subprocess.Popen(app_command)
        self.window_id = self.find_window("VulkanApp")

    def capture_frame(self):
        # Capture the window region using OS screenshot tools
        screenshot = ImageGrab.grab(bbox=self.get_window_geometry())
        return np.array(screenshot)

    def click(self, x, y):
        # Inject mouse click via xdotool
        subprocess.run(['xdotool', 'mousemove', '--window', self.window_id, str(x), str(y), 'click', '1'])
Programmatic control is faster and more reliable. External control is easier to add to existing applications without modification.
The RL Agent: PPO (Proximal Policy Optimization)
For the agent’s brain, we use PPO. This algorithm is the industry standard for stable, reliable learning.
Why PPO?
Older algorithms (like Vanilla Policy Gradient) were unstable. If the agent made one "bad" update, its performance would collapse, and it would never recover. PPO uses a Clipping Mechanism to ensure that each update doesn’t change the agent’s behavior too much.
Actor-Critic Architecture
The PPO agent has two "heads": 1. The Actor (Policy): Outputs probabilities for each action (e.g., 80% chance to click button A, 20% to click button B). 2. The Critic (Value): Predicts the future reward of the current state.
By comparing the actual reward to the Critic’s prediction, the agent calculates the Advantage—how much better (or worse) the action was than expected.
If the Advantage is positive, the agent increases the probability of that action in the future.
class PPOAgent:
    def select_action(self, state):
        # 1. Pass the screen pixels through the CNN
        # 'logits' come from the Actor head, 'value' from the Critic head
        logits, value = self.policy_net(state)

        # 2. Sample an action (exploration vs exploitation)
        # We don't always pick the best action; sometimes we pick
        # a less likely one to keep exploring.
        action = sample_from_distribution(logits)

        return action, value
Action Space Design
Define what the agent can do:
class ActionSpace:
    """Discrete actions the agent can take (e.g., Click X,Y or Press Key)."""
    def action_to_command(self, action_id):
        if action_id < self.num_click_actions:
            # Map grid cell to screen pixel coordinates
            return {'type': 'click', 'x': px, 'y': py}
        elif action_id < self.total_actions:
            # Map to specific keyboard keys (ESC, Space, etc.)
            return {'type': 'key', 'key': key_map[action_id - offset]}
        return {'type': 'wait'}
The grid-based clicking is discrete (required for most RL algorithms) but provides reasonable coverage of UI elements.
Training Loop
Put it all together:
def train_explorer():
    # 1. Initialize our curiosity module and the agent
    curiosity = RNDCuriosityModule()
    agent = PPOAgent()

    while True:
        # 2. Agent interacts with the Vulkan app
        action = agent.select_action(current_screen)
        execute_in_vulkan(action)

        # 3. Calculate 'Surprise' reward
        reward = curiosity.compute_intrinsic_reward(next_screen)

        # 4. If the app crashed, give a huge bonus reward!
        if app_crashed(): reward += 10.0

        # 5. Learn from this experience
        agent.update(experience_buffer)
        curiosity.update(next_screen)
Use Case 1: CI Bug Discovery
Train the agent overnight in CI:
name: RL Exploration Testing

on:
  schedule:
    - cron: '0 2 * * *'  # Run nightly at 2 AM

jobs:
  explore:
    runs-on: ubuntu-latest
    timeout-minutes: 360  # 6 hours

    steps:
      - uses: actions/checkout@v3

      - name: Build application
        run: |
          mkdir build && cd build
          cmake .. -DCMAKE_BUILD_TYPE=Release
          make -j$(nproc)

      - name: Install RL dependencies
        run: |
          pip install torch torchvision numpy opencv-python pyautogui

      - name: Run RL exploration
        run: |
          python scripts/rl_explorer.py \
            --app ./build/my_vulkan_app \
            --episodes 1000 \
            --checkpoint models/explorer_checkpoint.pt

      - name: Upload crash logs
        if: always()
        uses: actions/upload-artifact@v3
        with:
          name: rl-discovered-crashes
          path: crashes/
The agent explores your app for hours, logging any crashes with reproduction steps. More importantly, every visual anomaly it finds can be automatically funneled into the Bug Harvesting pipeline we established in Chapter 4, further strengthening your semantic validator with real-world failure cases.
Hyperparameter Tuning for QA
Exploration agents need different settings than gaming agents: * (Gamma): The "Discount Factor." We set this high (0.999) because we care about long-term sequences of clicks that lead to new menus. * (Lambda): For GAE (Generalized Advantage Estimation). Helps balance variance and bias. * Entropy Coefficient: We set this high (0.01 to 0.1) to force the agent to keep clicking randomly even when it thinks it found a good path. This is the "tireless" part of our QA tester.
Use Case 2: Automated Benchmarking
Train an agent to navigate to performance-intensive scenes:
class BenchmarkingAgent(PPOAgent):
    def __init__(self, *args, **kwargs):
        super().__init__(*args, **kwargs)
        self.fps_history = []

    def compute_reward(self, frame, fps):
        """Reward agent for finding slow scenes"""
        # Intrinsic curiosity reward
        intrinsic = self.curiosity.compute_intrinsic_reward(frame)

        # Extrinsic reward: finding low FPS is good (for benchmarking)
        extrinsic = 0.0
        if fps < 30:
            extrinsic = (30 - fps) / 30.0  # Reward proportional to slowness

        return intrinsic + extrinsic
Run this agent to automatically discover performance bottlenecks in your application.
Use Case 3: Automated Demo Mode
Train an agent to showcase features:
# Reward function for impressive demos
def demo_reward(state, action, next_state):
    # High reward for visual variety
    visual_change = np.mean(np.abs(next_state - state))

    # High reward for accessing different menus
    ui_diversity = measure_ui_diversity(next_state)

    # Penalty for getting stuck
    stuck_penalty = -1.0 if visual_change < 0.01 else 0.0

    return visual_change + ui_diversity + stuck_penalty
The trained agent can run in "demo mode" at trade shows or in trailers, automatically navigating through impressive features.
Debugging and Monitoring
Track what the agent is learning:
import matplotlib.pyplot as plt
from collections import deque

class ExplorationMonitor:
    def __init__(self):
        self.visited_states = {}  # Hash -> visit count
        self.crashes_found = []
        self.episode_rewards = deque(maxlen=100)

    def record_state(self, state):
        state_hash = hash(state.tobytes())

        if state_hash not in self.visited_states:
            self.visited_states[state_hash] = 0

        self.visited_states[state_hash] += 1

    def plot_exploration(self):
        # Histogram of state visit counts
        visit_counts = list(self.visited_states.values())

        plt.figure(figsize=(10, 5))
        plt.subplot(1, 2, 1)
        plt.hist(visit_counts, bins=50)
        plt.xlabel('Visit Count')
        plt.ylabel('Number of States')
        plt.title('State Visit Distribution')

        # Reward over time
        plt.subplot(1, 2, 2)
        plt.plot(self.episode_rewards)
        plt.xlabel('Episode')
        plt.ylabel('Total Reward')
        plt.title('Learning Progress')

        plt.tight_layout()
        plt.savefig('exploration_stats.png')

    def coverage_stats(self):
        total_states = len(self.visited_states)
        novel_states = sum(1 for c in self.visited_states.values() if c == 1)

        print(f"Total unique states: {total_states}")
        print(f"Novel states (seen once): {novel_states}")
        print(f"Crashes found: {len(self.crashes_found)}")
Summary
RL-based automated exploration combines curiosity-driven learning with practical Vulkan application testing:
Random Network Distillation: Provides intrinsic rewards for discovering novel application states without requiring a score.
PPO Agent: Learns to navigate the application, balancing exploration (finding new states) with exploitation (repeating actions that led to rewards).
Programmatic/External Control: Interfaces with Vulkan applications to capture frames and inject input events.
Multiple Use Cases: CI bug discovery, automated benchmarking, demo mode, and general GUI automation.
Practical CI Integration: Run overnight in GitHub Actions to discover crashes and edge cases automatically.
This approach finds bugs humans wouldn’t think to test, explores performance characteristics automatically, and can even learn to demonstrate your application—all using ML techniques applied to real Vulkan applications.