Development Environment
In this chapter, we’ll set up your environment for developing Vulkan applications and install some useful libraries. All the tools we’ll use, except for the compiler, are compatible with Windows, Linux and macOS, but the steps for installing them differ a bit, which is why they’re described separately here.
Getting the code
First we need to clone the code for the tutorial from the github repository. This requires an install of the git version control system.
With git installed we can locally clone the repository like this:
git clone https://github.com/KhronosGroup/Vulkan-TutorialThis will clone the repository to a new folder (inside the current one) called Vulkan-Tutorial. The Source files for the chapters are located in the attachments folder.
Dependency Install Scripts
To make the setup process easier, we’ve provided dependency install scripts for Windows and Linux:
Windows
For Windows, we provide a script that uses vcpkg to install all the required dependencies:
-
Make sure you have vcpkg installed. If not, follow the instructions at https://github.com/microsoft/vcpkg
-
Run the
scripts/install_dependencies_windows.batscript -
Follow the instructions to install the Vulkan SDK
While we are using vcpkg to enable this install script; the entire process is outlined below in detail and can be achieved without using the install script or needing vcpkg. That’s just a convenience to make the setup process easier.
Linux
For Linux, we provide a script that detects your package manager and installs all the required dependencies:
-
Run the
scripts/install_dependencies_linux.shscript -
Follow the instructions to install the Vulkan SDK
If you prefer to install the dependencies manually, or if you’re using macOS, follow the platform-specific instructions below.
Common considerations
Vulkan SDK
The most important part you’ll need for developing Vulkan applications is the SDK. It includes headers, standard validation layers, debugging tools and a loader for the Vulkan functions. The loader looks up the functions in the driver at runtime, similarly to GLEW for OpenGL—if you’re familiar with that.
The SDK can be downloaded from the LunarG website.
Proceed through the installation and pay attention to the installation location of the SDK.
The first thing we’ll do is verify that your graphics card and driver properly support Vulkan.
Go to the directory where you installed the SDK, open the bin directory and
run the vkcube demo.
There is another program in this directory that will be useful for
development. The slangc command line program will be
used to compile shaders from the human-readable
Slang Shading Language to bytecode.
We’ll cover this in depth in the
shader modules
chapter. The bin directory also contains the binaries of
the Vulkan loader and the validation layers, while the lib directory
contains the libraries.
Lastly, there’s the include directory that contains the Vulkan headers.
Feel free to explore the other files, but we won’t need them for this tutorial.
To automatically set the environment variables that VulkanSDK will use to
simplify CMake project configuration and other tooling, we recommend using
the setup-env script on Linux. You can add this script to your terminal’s auto-start
or IDE setup to ensure these environment variables are available in all your sessions.
If you receive an error message, then ensure that your drivers are up to date, include the Vulkan runtime and that your graphics card is supported. See the introduction chapter for links to drivers from the major vendors.
CMake
For all the warts of working in cross-platform projects, CMake has become an industry-wide staple. It allows developers to create a project wide build description file which takes care of setting up and configuring all the support tools required to create any project. Other build systems that achieve similar capabilities exist such as bazel, however, none are as widely used and accepted as CMake is. A full description of how to use CMake is beyond the scope of this tutorial, however, further details can be found at CMake
Vulkan SDK has support for using find_package. To use it with your project,
you can add the search path for the *-config.cmake to the HINTS portion of
the find_package config calls: i.e.
find_package(slang CONFIG HINTS "$ENV{VULKAN_SDK}/lib/cmake")In the future, FindVulkan.cmake might migrate to the *-config.cmake standard, however at the time of writing it is recommended to grab FindVulkan.cmake from VulkanSamples, as the one from Kitware is both deprecated and has bugs in the macOS build. You will find it in the code directory FindVulkan.cmake.
Using FindVulkan.cmake is a project-specific file, you can take it and make changes as necessary to work well in your build environment, and can craft it further to your needs. The one Khronos distributes in VulkanSamples is well tested and is a good starting point.
To use it, add it to your CMAKE_MODULE_PATH like this:
list(APPEND CMAKE_MODULE_PATH "${CMAKE_CURRENT_LIST_DIR}/CMake")This will allow other projects that distribute via Find*.cmake to be placed in that same folder. See the accompanying CMakeLists.txt for an example of a working project.
The Vulkan C++ headers also offer a C++ module. A large advantage of C++ modules is they give all the benefits of C++ without the overhead of long compile times. To use them, the .cppm file must be compiled for your target device.
|
Module support in the Vulkan C++ headers is still experimental and might not work with all compilers. Unless you want to experiment, it’s recommended to not use them. |
To enable the Vulkan C++20 module in the attachments template, configure CMake with:
cmake -DENABLE_CPP20_MODULE=ON ..When enabled, the CMakeLists.txt contains all the instructions needed for building the module automatically. The relevant snippet looks like this:
find_package (Vulkan REQUIRED)

# set up Vulkan C++ module (enabled when ENABLE_CPP20_MODULE=ON)
add_library(VulkanCppModule)
add_library(Vulkan::cppm ALIAS VulkanCppModule)

target_compile_definitions(VulkanCppModule PUBLIC
        VULKAN_HPP_DISPATCH_LOADER_DYNAMIC=1
        VULKAN_HPP_NO_STRUCT_CONSTRUCTORS=1
)

target_include_directories(VulkanCppModule PRIVATE "${Vulkan_INCLUDE_DIR}")

target_link_libraries(VulkanCppModule PUBLIC Vulkan::Vulkan)

set_target_properties(VulkanCppModule PROPERTIES CXX_STANDARD 20)

target_sources(VulkanCppModule
        PUBLIC
        FILE_SET cxx_modules TYPE CXX_MODULES
        BASE_DIRS "${Vulkan_INCLUDE_DIR}"
        FILES "${Vulkan_INCLUDE_DIR}/vulkan/vulkan.cppm"
)
The VulkanCppModule target only needs to be defined once, then add it to the dependencies of your consuming project, and it will be built automatically. You won’t need to also add Vulkan::Vulkan to your project.
target_link_libraries (${PROJECT_NAME} Vulkan::cppm)If you choose to keep modules disabled (the default), you can continue to use the
traditional header-based includes (e.g., #include <vulkan/vulkan_raii.hpp>). The
sample code in the attachments is written to compile either way and will import the
module only when ENABLE_CPP20_MODULE=ON (which defines USE_CPP20_MODULES).
Window Management
As mentioned before, Vulkan by itself is a platform-agnostic API and does not include tools for creating a window to display the rendered results. To benefit from the cross-platform advantages of Vulkan, we’ll use the GLFW library to create a window, which supports Windows, Linux and macOS. There are other libraries available for this purpose, like SDL, but the advantage of GLFW is that it also abstracts away some of the other platform-specific things in Vulkan besides just window creation.
An unfortunate disadvantage is GLFW doesn’t work in Android or iOS; it is a desktop-only solution. SDL does offer mobile support; however, mobile windowing support is best done by interfacing with the Operating system such as using the JNI in Android.
GLM
Unlike DirectX 12, Vulkan does not include a library for linear algebra operations, so we’ll have to download one. GLM is a nice library that is designed for use with graphics APIs and is also commonly used with OpenGL.
Texturing library
Vulkan by itself has no support for reading various texture resources such as png, jpeg, or ktx files. However, as this is a large topic, it is beyond the scope of this tutorial to fully dive into all the various formats. For this tutorial, we will use stb as a dependency for loading up textures. We do recommend investigating ktx to gain full advantage of a texture format that is designed for graphics applications in mind.
Modeling library
Model formats are numerous and expose a lot of details everywhere. In general, with Vulkan and other graphical APIs, the most important things to know are vertex information, texture coordinates, and potentially diffuse color details. GLTF is an advanced feature-full model format with easy-to-support features available in a cross-platform library. However, for this tutorial, we’re going to use tinyobjloader for its pure simplicity. We recommend tinyobjloader library only for small not complex projects.
Windows
Development in Windows is easiest with Visual Studio. CLion works well with Windows as does Android Studio, however, Visual Studio is very popular and well-supported, so we’ll discuss getting dependencies there. For complete C++20 support, you need to use any version greater than 2019. The steps outlined below were written for VS 2022.
Package management
For all platforms, we recommend using a platform management tool. Windows natively doesn’t depend upon package management, so this is a foreign concept. However, Microsoft has introduced a fantastic package management tool which does work cross-platform. VCPkg also includes setting up all required CMake settings. We recommend following the excellent documentation here for details on how to use CMake in Windows projects.
This setup allows Windows developers to natively work in Visual Studio using CMake, and the integration is rather quite good. Alternatively, CLion natively supports CMakeLists.txt projects on all platforms and works/functions exactly like Android Studio. It is also a free IDE.
GLFW
We recommend using vcpkg as mentioned before to install packages, to do that,
run this from the command line: vcpkg install glfw3
If you desire to install without vcpkg, you can find the latest release of GLFW on the official website.
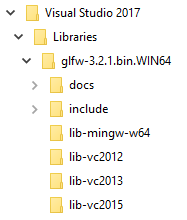
In this tutorial, we’ll be using the 64-bit binaries, but you can of course also
choose to build in 32-bit mode. In that case make sure to link with the Vulkan
SDK binaries in the Lib32 directory instead of Lib. After downloading it, extract the archive
to a convenient location. We’ve chosen to create a Libraries directory in the
Visual Studio directory under documents.
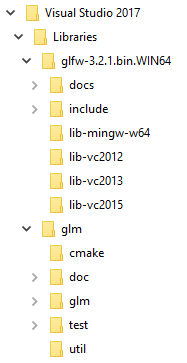
GLM
As a pure graphics api, Vulkan does not include a library for linear algebra operations, so we’ll have to download one. LM can also be installed with vcpkg like so: vcpkg install glm
Alternatively, GLM is a header-only library, so download the GLM which is designed for use with graphics APIs and is also commonly used with OpenGL.
Linux
These instructions will be aimed at Ubuntu, Fedora and Arch Linux users, but
you may be able to follow along by changing the package manager-specific
commands to the ones that are appropriate for you.
You should have a compiler that supports C++20 (GCC 7+ or Clang 5+).
You’ll also need cmake. Most of this can be installed via
larger packages such as build-essentials.
We recommend using CLion or another IDE; however, as with most things in Linux, GUIs are entirely optional.
Vulkan tarball
The most important parts you’ll need for developing Vulkan applications on Linux are the Vulkan loader, validation layers, and a couple of command-line utilities to test whether your machine is Vulkan-capable:
Download the VulkanSDK tarball from LunarG. Place the uncompressed VulkanSDK in a convenient path, and create a symbolic link to the latest on like so:
pushd vulkansdk
tar -xf vulkansdk-linux-x86_64-1.4.304.1.tar.xz
ln -s 1.4.304.1 default
Then add the following to your ~/.bashrc file so Vulkan’s environment variables are enabled everywhere:
source ~/vulkanSDK/default/setup-env.shIf installation was successful, you should be all set with the Vulkan portion.
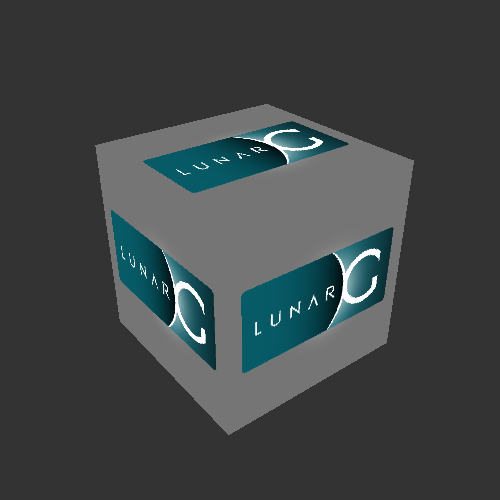
Remember to run vkcube and ensure you see the following pop up in a window:
If you receive an error message, then ensure that your drivers are up to date, include the Vulkan runtime and that your graphics card is supported. See the introduction chapter for links to drivers from the major vendors.
Ninja
Ninja is a rapid build system that CMake has support for in all
platforms. We recommend installing it with sudo apt install ninja-build
X Window System and XFree86-VidModeExtension
It is possible that these libraries are not on the system, if not, you can
install them using the following commands:
* sudo apt install libxxf86vm-dev or dnf install libXxf86vm-devel:
Provides an interface to the XFree86-VidModeExtension.
* sudo apt install libxi-dev or dnf install libXi-devel: Provides an X
Window System client interface to the XINPUT extension.
GLFW
We’ll be installing GLFW from the following command:
sudo apt install libglfw3-devor
sudo dnf install glfw-develor
sudo pacman -S glfw-wayland # glfw-x11 for X11 usersGLM
It is a header-only library that can be installed from the libglm-dev or
glm-devel package:
sudo apt install libglm-devor
sudo dnf install glm-develor
sudo pacman -S glmSetting up CLion (optional)
You can get CLion from there. We recommend installing from the jetbrains toolbox so it can keep CLion up to date automatically. To use an IDE like CLion, we have to setup the environment variables that are otherwise setup by when the terminal executes
source ~/vulkanSDK/default/setup-env.shTo do that, open Settings, then select "Build, Execution, Deployment" and then select CMake. At the bottom of that window will be the environment variable. Add VULKAN_SDK=<fullPathToVulkanSDK> there and Vulkan will be found during compile time. Note that the full path is not just the top-level VulkanSDK folder. Run the following in your terminal to find the exact path
echo $VULKAN_SDKAs a convenience, for runtime at least, we recommend placing the layers system wide. To do that, from the terminal do this:
sudo cp $VULKAN_SDK/lib/libVkLayer_*.so /usr/local/lib/
sudo mkdir -p /usr/local/share/vulkan/explicit_layer.d
sudo cp $VULKAN_SDK/share/vulkan/explicit_layer.d/VkLayer_*.json /usr/local/share/vulkan/explicit_layer.d
Alternatively, you could add VK_LAYER_PATH to your system environment
variables, and point it to $VULKAN_SDK/share/vulkan/explicit_layer.d Also,
you’d want to add to LD_LIBRARY_CONFIG the $VULKAN_SDK/lib path. This is
all done for you by the setup-env.sh file when using the terminal.
Setting up a CMake project
Now that you have installed all the dependencies, we can set up a basic CMake project for Vulkan and write a little bit of code to make sure that everything works.
We will assume that you already have some basic experience with CMake, like how variables and rules work. If not, you can get up to speed very quickly with this tutorial.
You can now use the attachments directory in this tutorial as a template for your
Vulkan projects. Make a copy, rename it to something like HelloTriangle
and remove all the code in main.cpp.
You are now all set for the real adventure.
macOS
These instructions will assume you are using Xcode and the Homebrew package manager. Also, keep in mind that you will need at least macOS version 10.11, and your device needs to support the Metal API.
Vulkan SDK
The SDK version for macOS internally uses MoltenVK. There is no native support for Vulkan on macOS, so what MoltenVK does is actually act as a layer that translates Vulkan API calls to Apple’s Metal graphics framework. With this, you can take advantage of the debugging and performance benefits of Apple’s Metal framework.
After downloading the installer for macOS, double-click the installer and follow the prompts. Keep a note of the installation location during the "Installation Folder" step. You will need to reference it when creating your projects in Xcode.
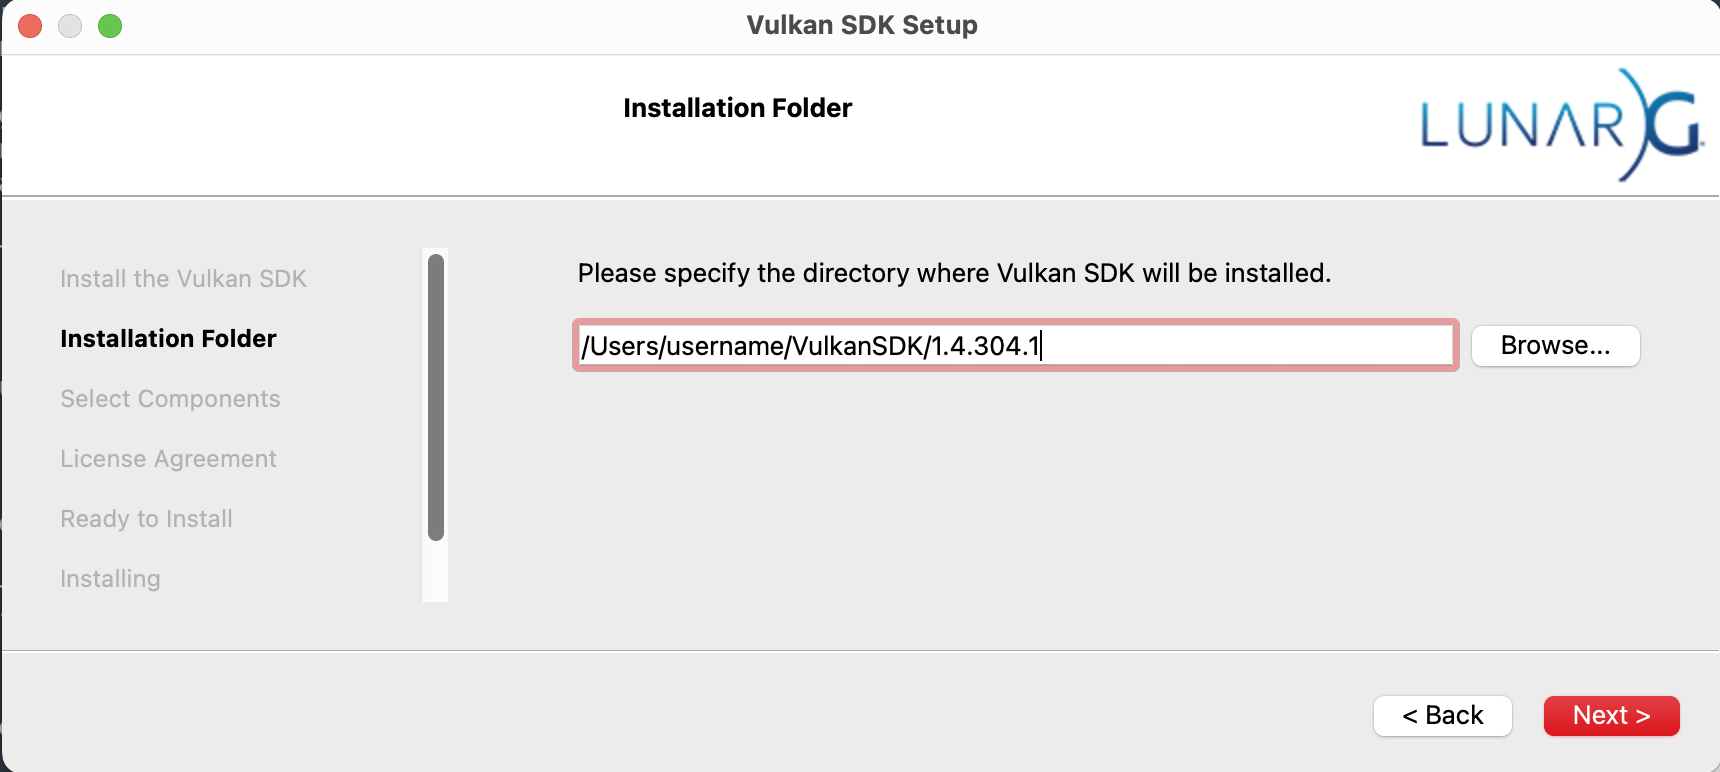
Note: In this tutorial, vulkansdk will refer to the path where you installed the VulkanSDK.
Within the vulkansdk/Applications folder you should have some executable files that will run a few demos using the SDK.
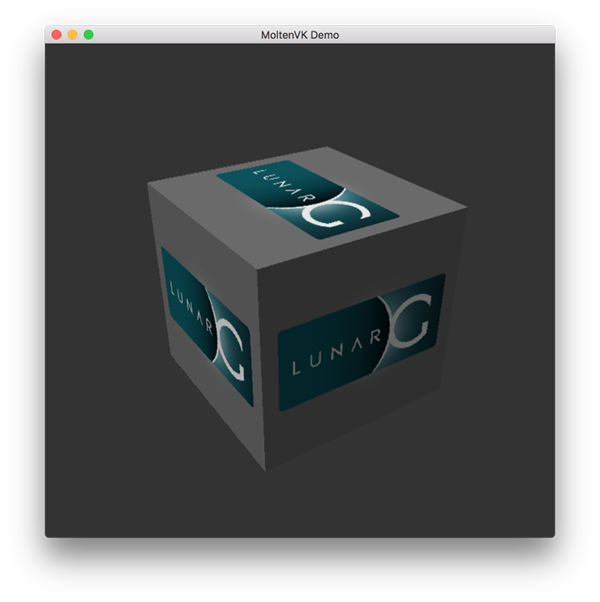
Run the vkcube executable and you will see the following:
GLFW
To install GLFW on MacOS we will use the Homebrew package manager to get the glfw package:
brew install glfwSetting up Xcode
Now that all the dependencies are installed, we can set up a basic Xcode project for Vulkan.
Most of the instructions here are essentially a lot of "plumbing," so we can get all the dependencies linked to the project.
Also, keep in mind that during the following instructions whenever we mention the folder vulkansdk we are referring to the folder where you extracted the Vulkan SDK.
We recommend using CMake everywhere, and Apple is no different. An example of how to use CMake for Apple can be found here We also have documentation for using a cmake project in Apple environments at the VulkanSamples project. It targets both iOS and Desktop Apple.
Once you use CMake with the XCode generator, open the resulting xcode project. If you use the code directory of this tutorial, you can do this from the command line:
cd code
cmake -G XCode
The last thing you need to set up is a couple of environment variables.
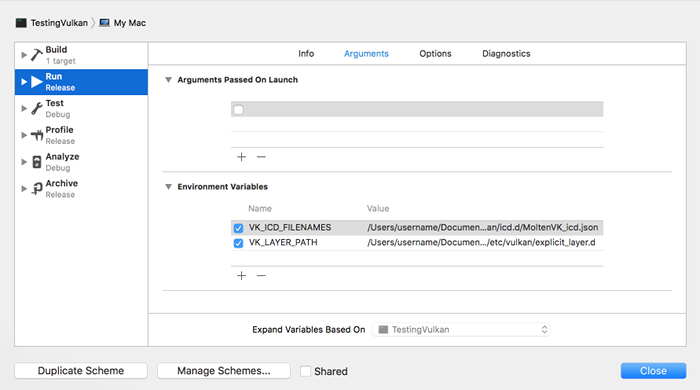
On Xcode toolbar go to Product > Scheme > Edit Scheme..., and in the Arguments tab add the two following environment variables:
-
VK_ICD_FILENAMES =
vulkansdk/macOS/share/vulkan/icd.d/MoltenVK_icd.json -
VK_LAYER_PATH =
vulkansdk/macOS/share/vulkan/explicit_layer.d
Uncheck 'shared'. It should look like so:
Finally, you should be all set!
You are now all set for the real thing.
Android
Vulkan is a first-class API on Android and widely supported. But using it differs in several key areas from window management to build systems. So while the basic chapters focus on desktop platforms, the tutorial also has a dedicated chapter that walks you through setting up your development environment and getting the tutorial code up-and-running on Android.
Setting up a CMake project
Now that you have installed all the dependencies, we can set up a basic CMake project for Vulkan and write a little bit of code to make sure that everything works.
We will assume that you already have some basic experience with CMake, like how variables and rules work. If not, you can get up to speed very quickly with this tutorial.
The attachment\template folder contains a CMake template that you can use to create a project file in the build folder for your IDE of choice. Use this as a starting point to work along the tutorial:
cd attachments\template
cmake -B build -S . -DCMAKE_TOOLCHAIN_FILE=[path\to\vcpkg]\scripts\buildsystems\vcpkg.cmake
Alternatively you can do the same in the attachments folder, which will create a project with all chapters from the tutorial:
cd attachments
cmake -B build -S . -DCMAKE_TOOLCHAIN_FILE=[path\to\vcpkg]\scripts\buildsystems\vcpkg.cmake
Congratulations, you’re all set for playing with Vulkan!